
如何在 WordPress 和 Blogger 中免费创建附属产品表
已发表: 2021-09-20在本文中,我将向您展示如何使用 HTML 和 CSS 创建附属产品表并将其添加到您的博客和 Wordpress 网站。
此方法完全免费,您可以轻松将此产品比较表添加到您的网站。
但是,在此之前,让我们了解为什么您的网站上需要这种类型的表格。
假设您正在运行一个亚马逊会员博客,并且您希望以有组织的方式显示产品和购买链接。
在这种情况下,此联属产品表将帮助您进行联属网络营销活动。
如何在 Blogger 中添加附属产品表?
要添加附属产品表,请按照以下步骤操作。
#1 。 转到 Blogger 仪表板并打开任何博客文章。
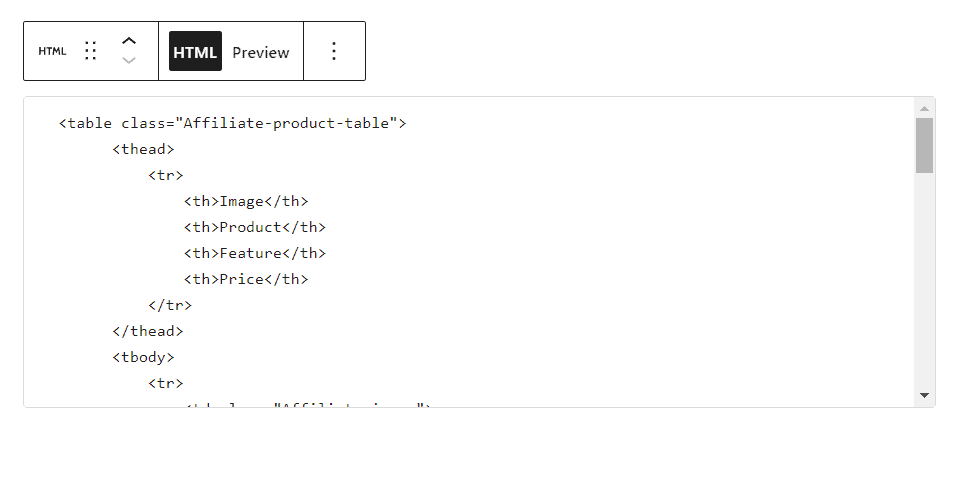
#2 。 现在切换到 HTML 视图并从此处复制 HTML 代码。
<table class="Affiliate-product-table"> <thead> <tr> <th>Image</th> <th>Product</th> <th>Feature</th> <th>Price</th> </tr> </thead> <tbody> <tr> <td class="Affiliate-image"> <div class="p_tag">TOP Pick </div> <a href="#" rel="nofollow" target="_blank"> <img src="https://dlcdnwebimgs.asus.com/gain/418d0f3b-aeef-44a0-81e0-4a68cc46e9f0/" class="p-img"></a> </td> <td class="Affiliate-product"> <a href="#" rel="nofollow" target="_blank"> <div class="p_title"> Asus ROG Zephyrus G14 </div></a> </td> <td class="Affiliate-feature"> It delivers the goods in gaming but also delivers 11 hours of battery life </td> <td class="Affiliate-btn"> <a href="#" rel="nofollow" target="_blank">Buy Now </a> </td> </tr> <tr> <td class="Affiliate-image"> <div class="p_tag"> Trending </div> <a href="#" rel="nofollow" target="_blank"> <img src="https://res-1.cloudinary.com/grover/image/upload/e_trim/c_limit,f_auto,fl_png8.lossy,h_1280,q_auto,w_1280/v1623749139/bq18ot4ooj4h9g3ciuki.png" class="p-img"></a> </td> <td class="Affiliate-product"> <a href="#" rel="nofollow" target="_blank"> <div class="p_title"> Razer Blade 14 </div> </a> </td> <td class="Affiliate-feature"> Razer Blade 14 offers powerful components and excellent performance. </td> <td class="Affiliate-btn"> <a href="#" rel="nofollow" target="_blank">Buy Now </a> </td> </tr> </tbody> </table>#3 :现在更改此代码中的产品名称、产品描述、图像 URL 和链接 URL。
#4 : 现在复制下面的 CSS 代码并将其粘贴到此代码下方。
<style> /* Affiliate Product Box */ .Affiliate-product-table { margin: 30px 0; } .Affiliate-product-table thead { background: #424242; color: #fff; } .Affiliate-product-table, .Affiliate-product-table td, .Affiliate-product-table th { border: none; box-sizing: border-box; } .Affiliate-product-table thead th { font-weight: 300; font-size: 17px; padding: 10px; margin: 0; } .Affiliate-product-table tr { display: flex !important; flex-wrap: wrap !important; align-items: center; transition: 0.3s; } .Affiliate-product-table tbody tr:hover { transform: scale(1.02); transition: 0.3s; box-shadow: 0 0 20px -4px rgba(0, 0, 0, 0.15); } .Affiliate-product-table tbody tr { border: 2px solid #e1e1e1; margin-bottom: 5px; } .Affiliate-product-table tr td:first-child, .Affiliate-product-table tr th:first-child { width: 25%; } .Affiliate-product-table tr td:nth-child(2), .Affiliate-product-table tr th:nth-child(2) { width: 25%; } .Affiliate-product-table tr td:nth-child(3), .Affiliate-product-table tr th:nth-child(3) { width: 30%; } .Affiliate-product-table tr td:last-child, .Affiliate-product-table tr th:last-child { width: 20%; } .Affiliate-product-table .Affiliate-image { position: relative; } .Affiliate-product-table .p_tag { position: absolute; left: -10px; top: 0; background: #5898ff; padding: 5px 5px; color: #fff; font-size: 12px; text-transform: uppercase; } .Affiliate-product-table .p_tag::after { content: ' '; display: block; position: absolute; left: -10px; bottom: -7px; border-color: rgba(0, 0, 0, 0) #133091 rgba(0, 0, 0, 0) rgba(0, 0, 0, 0); border-style: inset solid inset inset; border-width: 0 10px 7px; } .Affiliate-product-table .p-img { width: 90%; max-height: 140px; margin: 0 auto; display: block; height: auto; object-fit: contain; } .Affiliate-product-table .Affiliate-product .p_title { font-weight: 600; font-size: 17px; line-height: 1.2; text-decoration: none; color: #4b77b7; } .Affiliate-product-table .Affiliate-btn a { background: #ef651e; text-transform: capitalize; padding: 10px; border-radius: 5px; color: #fff; font-size: 15px; display: block; text-align: center; transition: 0.3s; } .Affiliate-product-table .Affiliate-btn a:hover { background: #000; transition: 0.3s; } .Affiliate-product-table .Affiliate-feature { font-size: 16px; overflow: hidden; text-overflow: ellipsis; display: -webkit-box; -webkit-line-clamp: 10; -webkit-box-orient: vertical; } @media only screen and (max-width: 768px) { .Affiliate-product-table .p_tag { position: absolute; left: -20px; } .Affiliate-product-table tbody tr { padding: 10px; } .Affiliate-product-table tr td:first-child { width: 40%; } .Affiliate-product-table tr td:nth-child(2) { width: 60%; } .Affiliate-product-table tr td:nth-child(3), .Affiliate-product-table tr th:nth-child(3) { width: 100%; } .Affiliate-product-table tr td:last-child, .Affiliate-product-table tr th:last-child { width: 100%; } .Affiliate-product-table .Affiliate-btn a { margin-top: 20px; } .Affiliate-product-table tr th:nth-child(2) { width: 100%; } .Affiliate-product-table tr th:first-child, .Affiliate-product-table tr th:nth-child(3), .Affiliate-product-table tr th:last-child { display: none; } } /* End Affiliate Product Box */ </style>#5 :现在发布页面并将产品附属表添加到您的博客网站。

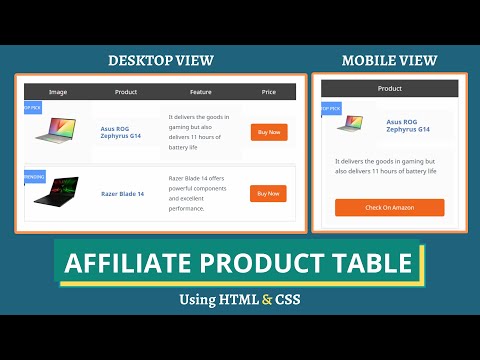
现在产品比较表将如下所示。 您还可以通过更改 CSS 代码来更改按钮颜色、表格标题颜色。
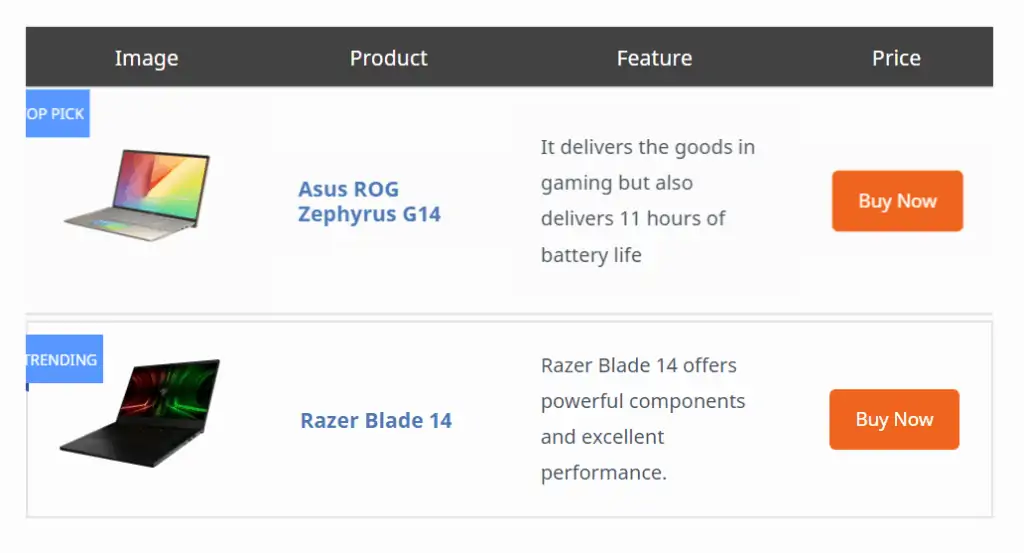
在这里,您可以完全控制表格的外观并且它是免费的。
您还可以查看以下视频,了解如何编辑此代码。
如何在 Wordpress 中添加附属产品表?
添加这些附属产品表非常容易。 您可以使用上述代码添加此表,也可以为此使用表插件。
要使用代码添加此表,您只需打开博客文章。
现在搜索自定义 HTML块并粘贴上面的代码。 现在更改必要的字段,如产品名称、产品链接、描述等。
在这里,您可以在帖子编辑器中看到预览,这有助于您直观地查看块。
之后,点击发布按钮,表格将添加到您的 Wordpress 网站。
这种方法最令人头疼的是,您必须手动更改代码中的所有内容,然后表格才能正常工作。
如果您想要一种更简单的方法,那么您可以为此使用专用插件。 因此,您可以直观地编辑表格。
但是,它们中的大多数在免费版本中功能有限,您必须支付一些钱才能完全访问。
这里有一些用于 Wordpress 的表格插件,可让您创建产品比较表。
- 平板电脑(免费)
- WP 表生成器
- AAWP
- 亚松出版社
- AmaLinks Pro
- 附属的
如果您使用任何页面构建器,如 Elementor、Kadence 块构建器,那么您可以从头开始创建这些类型的亚马逊附属表。
您也可以使用默认的 Wordpress 表格,但该表格没有响应性,并且非常适合具有两列的小表格。
这就是为什么我建议您使用代码方法,因为它提供了完全的自定义并且表格是完全响应的。 它根据屏幕大小调整表格的大小。
您可以使用此表来宣传您的亚马逊附属产品或任何其他附属服务,如托管、插件等。
该附属表使内容具有专业的外观,并增加了链接点击和转换的机会。
如果您对此有任何疑问,请随时在评论部分问我。
如果您想了解与博客相关的最新提示和技巧,请考虑订阅我们的Youtube 频道Key2blogging。
推荐:如何使用 HTML 和 CSS 添加优缺点表?