
WordPress 및 Blogger에서 무료로 제휴 제품 테이블을 만드는 방법
게시 됨: 2021-09-20이 기사에서는 HTML 및 CSS를 사용하여 제휴 제품 테이블을 만들고 이를 블로거 및 Wordpress 웹사이트에 추가하는 방법을 보여줍니다.
이 방법은 완전 무료이며 이 제품 비교 표를 웹사이트에 쉽게 추가할 수 있습니다.
그러나 그 전에 웹 사이트에 이러한 유형의 테이블이 필요한 이유를 이해하겠습니다.
Amazon 제휴 블로그를 운영 중이고 조직적인 방식으로 제품 및 구매 링크를 표시하려고 한다고 가정해 보겠습니다.
이 경우 이 제휴 제품 테이블은 제휴 마케팅 캠페인에 도움이 될 것입니다.
Blogger에서 제휴 제품 표를 추가하는 방법은 무엇입니까?
제휴 제품 테이블을 추가하려면 다음 단계를 따르세요.
#1 . Blogger 대시보드로 이동하여 블로그 게시물을 엽니다.
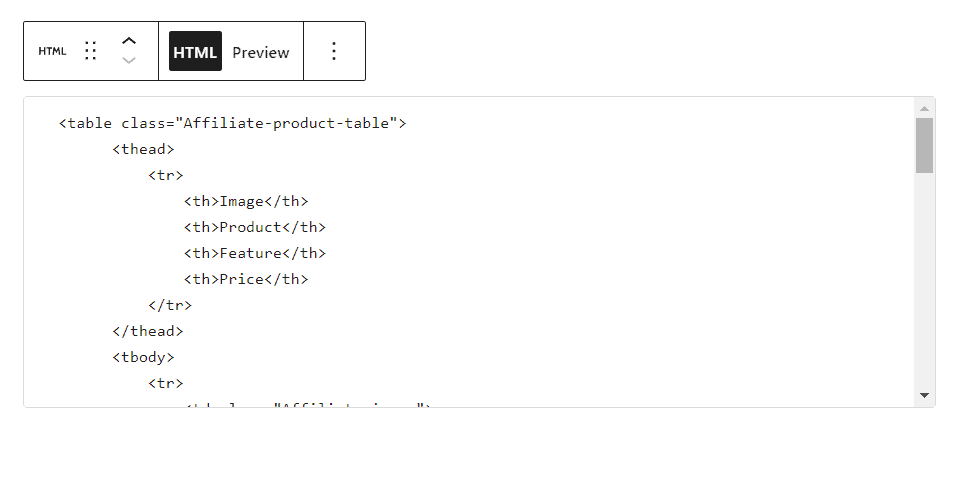
#2 . 이제 HTML 보기로 전환하고 여기에서 HTML 코드를 복사합니다.
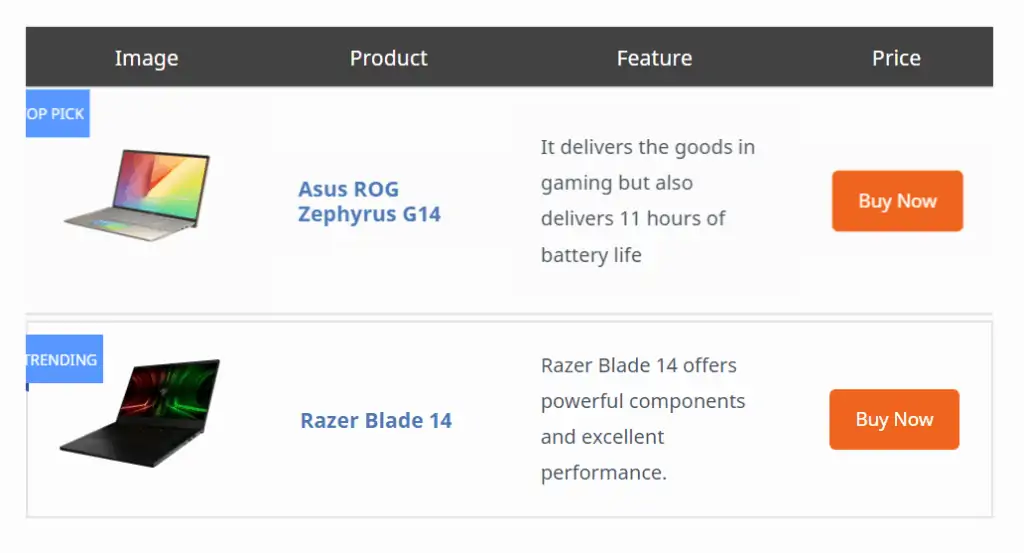
<table class="Affiliate-product-table"> <thead> <tr> <th>Image</th> <th>Product</th> <th>Feature</th> <th>Price</th> </tr> </thead> <tbody> <tr> <td class="Affiliate-image"> <div class="p_tag">TOP Pick </div> <a href="#" rel="nofollow" target="_blank"> <img src="https://dlcdnwebimgs.asus.com/gain/418d0f3b-aeef-44a0-81e0-4a68cc46e9f0/" class="p-img"></a> </td> <td class="Affiliate-product"> <a href="#" rel="nofollow" target="_blank"> <div class="p_title"> Asus ROG Zephyrus G14 </div></a> </td> <td class="Affiliate-feature"> It delivers the goods in gaming but also delivers 11 hours of battery life </td> <td class="Affiliate-btn"> <a href="#" rel="nofollow" target="_blank">Buy Now </a> </td> </tr> <tr> <td class="Affiliate-image"> <div class="p_tag"> Trending </div> <a href="#" rel="nofollow" target="_blank"> <img src="https://res-1.cloudinary.com/grover/image/upload/e_trim/c_limit,f_auto,fl_png8.lossy,h_1280,q_auto,w_1280/v1623749139/bq18ot4ooj4h9g3ciuki.png" class="p-img"></a> </td> <td class="Affiliate-product"> <a href="#" rel="nofollow" target="_blank"> <div class="p_title"> Razer Blade 14 </div> </a> </td> <td class="Affiliate-feature"> Razer Blade 14 offers powerful components and excellent performance. </td> <td class="Affiliate-btn"> <a href="#" rel="nofollow" target="_blank">Buy Now </a> </td> </tr> </tbody> </table>#3 : 이제 이 코드에서 제품 이름, 제품 설명, 이미지 URL 및 링크 URL을 변경합니다.
#4 : 이제 아래 CSS 코드를 복사하여 이 코드 아래에 붙여넣습니다.
<style> /* Affiliate Product Box */ .Affiliate-product-table { margin: 30px 0; } .Affiliate-product-table thead { background: #424242; color: #fff; } .Affiliate-product-table, .Affiliate-product-table td, .Affiliate-product-table th { border: none; box-sizing: border-box; } .Affiliate-product-table thead th { font-weight: 300; font-size: 17px; padding: 10px; margin: 0; } .Affiliate-product-table tr { display: flex !important; flex-wrap: wrap !important; align-items: center; transition: 0.3s; } .Affiliate-product-table tbody tr:hover { transform: scale(1.02); transition: 0.3s; box-shadow: 0 0 20px -4px rgba(0, 0, 0, 0.15); } .Affiliate-product-table tbody tr { border: 2px solid #e1e1e1; margin-bottom: 5px; } .Affiliate-product-table tr td:first-child, .Affiliate-product-table tr th:first-child { width: 25%; } .Affiliate-product-table tr td:nth-child(2), .Affiliate-product-table tr th:nth-child(2) { width: 25%; } .Affiliate-product-table tr td:nth-child(3), .Affiliate-product-table tr th:nth-child(3) { width: 30%; } .Affiliate-product-table tr td:last-child, .Affiliate-product-table tr th:last-child { width: 20%; } .Affiliate-product-table .Affiliate-image { position: relative; } .Affiliate-product-table .p_tag { position: absolute; left: -10px; top: 0; background: #5898ff; padding: 5px 5px; color: #fff; font-size: 12px; text-transform: uppercase; } .Affiliate-product-table .p_tag::after { content: ' '; display: block; position: absolute; left: -10px; bottom: -7px; border-color: rgba(0, 0, 0, 0) #133091 rgba(0, 0, 0, 0) rgba(0, 0, 0, 0); border-style: inset solid inset inset; border-width: 0 10px 7px; } .Affiliate-product-table .p-img { width: 90%; max-height: 140px; margin: 0 auto; display: block; height: auto; object-fit: contain; } .Affiliate-product-table .Affiliate-product .p_title { font-weight: 600; font-size: 17px; line-height: 1.2; text-decoration: none; color: #4b77b7; } .Affiliate-product-table .Affiliate-btn a { background: #ef651e; text-transform: capitalize; padding: 10px; border-radius: 5px; color: #fff; font-size: 15px; display: block; text-align: center; transition: 0.3s; } .Affiliate-product-table .Affiliate-btn a:hover { background: #000; transition: 0.3s; } .Affiliate-product-table .Affiliate-feature { font-size: 16px; overflow: hidden; text-overflow: ellipsis; display: -webkit-box; -webkit-line-clamp: 10; -webkit-box-orient: vertical; } @media only screen and (max-width: 768px) { .Affiliate-product-table .p_tag { position: absolute; left: -20px; } .Affiliate-product-table tbody tr { padding: 10px; } .Affiliate-product-table tr td:first-child { width: 40%; } .Affiliate-product-table tr td:nth-child(2) { width: 60%; } .Affiliate-product-table tr td:nth-child(3), .Affiliate-product-table tr th:nth-child(3) { width: 100%; } .Affiliate-product-table tr td:last-child, .Affiliate-product-table tr th:last-child { width: 100%; } .Affiliate-product-table .Affiliate-btn a { margin-top: 20px; } .Affiliate-product-table tr th:nth-child(2) { width: 100%; } .Affiliate-product-table tr th:first-child, .Affiliate-product-table tr th:nth-child(3), .Affiliate-product-table tr th:last-child { display: none; } } /* End Affiliate Product Box */ </style>#5 : 이제 페이지를 게시하면 제품 제휴 테이블이 블로거 웹사이트에 추가됩니다.

이제 제품 비교 테이블은 다음과 같습니다. CSS 코드를 변경하여 버튼 색상, 표 제목 색상을 변경할 수도 있습니다.
여기에서 테이블의 모양을 완전히 제어할 수 있으며 무료입니다.
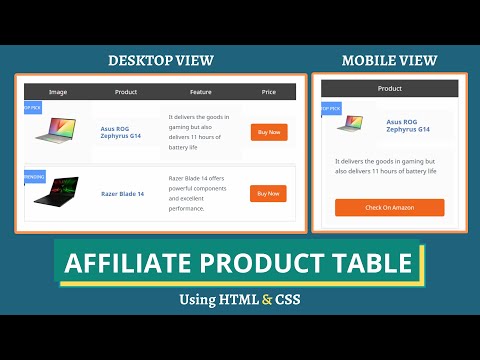
이 코드를 편집하는 방법에 대한 아래 비디오를 확인할 수도 있습니다.
Wordpress에서 Affiliate 제품 테이블을 추가하는 방법은 무엇입니까?
이러한 제휴 제품 테이블을 추가하는 것은 매우 쉽습니다. 위의 코드를 사용하거나 테이블 플러그인 을 사용하여 이 테이블을 추가할 수 있습니다.
코드를 사용하여 이 테이블을 추가하려면 블로그 게시물을 열기만 하면 됩니다.
이제 사용자 정의 HTML 블록을 검색하고 위의 코드를 붙여넣습니다. 이제 제품 이름, 제품 링크, 설명 등과 같은 필수 필드를 변경하십시오.
여기에서 블록을 시각적으로 볼 수 있도록 도와주는 포스트 편집기에서 미리보기를 볼 수 있습니다.
그런 다음 게시 버튼을 누르면 표가 Wordpress 웹사이트에 추가됩니다.
이 방법의 가장 큰 골칫거리는 코드의 모든 것을 수동으로 변경해야 테이블이 작동한다는 것입니다.
더 간단한 접근 방식을 원하면 전용 플러그인을 사용할 수 있습니다. 따라서 테이블을 시각적으로 편집할 수 있습니다.
그러나 대부분은 무료 버전에서 기능이 제한되어 있으며 전체 액세스를 위해서는 약간의 비용을 지불해야 합니다.
다음은 제품 비교 테이블을 만들 수 있는 Wordpress용 테이블 플러그인입니다.
- 테이블프레스(무료)
- WP 테이블 빌더
- AAWP
- 아존프레스
- 아마링크스 프로
- 제휴 가능
Elementor, Kadence 블록 빌더와 같은 페이지 빌더를 사용하는 경우 이러한 유형의 Amazon 제휴 테이블을 처음부터 생성할 수 있습니다.
기본 Wordpress 테이블을 사용할 수도 있지만 이 테이블은 반응하지 않으며 두 개의 열이 있는 작은 테이블에서 완벽하게 작동합니다.
그렇기 때문에 완전한 사용자 정의를 제공하고 테이블이 완전히 반응하므로 코드 방법을 사용하는 것이 좋습니다. 화면 크기에 따라 테이블의 크기를 조정합니다.
이 표를 사용하여 Amazon 제휴 제품 또는 호스팅, 플러그인 등과 같은 기타 제휴 서비스를 홍보할 수 있습니다.
이 제휴 테이블은 콘텐츠에 전문적인 느낌을 주고 링크 클릭 및 전환 가능성을 높입니다.
이와 관련하여 의문 사항이 있으면 언제든지 댓글 섹션에서 저에게 질문하십시오.
블로깅과 관련된 최신 팁과 요령으로 최신 정보를 얻으려면 YouTube 채널 Key2blogging 구독을 고려하십시오.
권장 사항 : HTML 및 CSS를 사용하여 장단점 표를 추가하는 방법은 무엇입니까?