
วิธีสร้างตารางผลิตภัณฑ์พันธมิตรใน WordPress & Blogger ฟรี
เผยแพร่แล้ว: 2021-09-20ในบทความนี้ ผมจะแสดงให้คุณเห็นว่าคุณสามารถสร้างตารางผลิตภัณฑ์ในเครือโดยใช้ HTML & CSS และเพิ่มลงในเว็บไซต์บล็อกเกอร์และ Wordpress ของคุณได้อย่างไร
วิธีนี้ไม่มีค่าใช้จ่ายใด ๆ ทั้งสิ้น และคุณสามารถเพิ่มตารางเปรียบเทียบผลิตภัณฑ์นี้ลงในเว็บไซต์ของคุณได้อย่างง่ายดาย
แต่ก่อนหน้านั้น มาทำความเข้าใจว่าทำไมคุณถึงต้องการตารางประเภทนี้ในเว็บไซต์ของคุณ
สมมติว่าคุณกำลังใช้งานบล็อกพันธมิตรของ amazon และต้องการแสดงผลิตภัณฑ์และซื้อลิงก์อย่างเป็นระเบียบ
ในกรณีนี้ ตารางผลิตภัณฑ์ของ Affiliate จะช่วยคุณในแคมเปญการตลาด Affiliate ของคุณ
จะเพิ่มตารางผลิตภัณฑ์ Affiliate ใน Blogger ได้อย่างไร?
ในการเพิ่มตารางผลิตภัณฑ์ในเครือ ให้ทำตามขั้นตอนด้านล่าง
#1 . ไปที่แดชบอร์ดของ Blogger และเปิดโพสต์บล็อกใดๆ
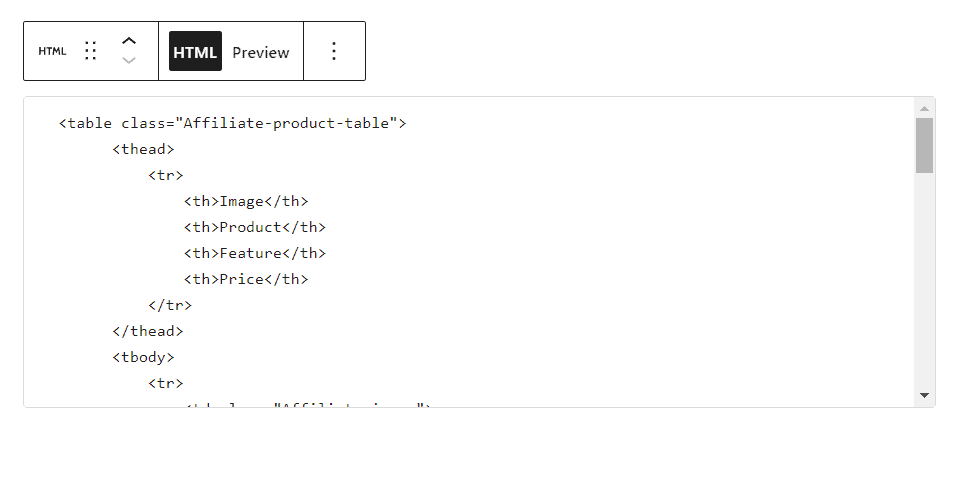
#2 . ตอนนี้เปลี่ยนเป็นมุมมอง HTML และคัดลอกโค้ด HTML จากที่นี่
<table class="Affiliate-product-table"> <thead> <tr> <th>Image</th> <th>Product</th> <th>Feature</th> <th>Price</th> </tr> </thead> <tbody> <tr> <td class="Affiliate-image"> <div class="p_tag">TOP Pick </div> <a href="#" rel="nofollow" target="_blank"> <img src="https://dlcdnwebimgs.asus.com/gain/418d0f3b-aeef-44a0-81e0-4a68cc46e9f0/" class="p-img"></a> </td> <td class="Affiliate-product"> <a href="#" rel="nofollow" target="_blank"> <div class="p_title"> Asus ROG Zephyrus G14 </div></a> </td> <td class="Affiliate-feature"> It delivers the goods in gaming but also delivers 11 hours of battery life </td> <td class="Affiliate-btn"> <a href="#" rel="nofollow" target="_blank">Buy Now </a> </td> </tr> <tr> <td class="Affiliate-image"> <div class="p_tag"> Trending </div> <a href="#" rel="nofollow" target="_blank"> <img src="https://res-1.cloudinary.com/grover/image/upload/e_trim/c_limit,f_auto,fl_png8.lossy,h_1280,q_auto,w_1280/v1623749139/bq18ot4ooj4h9g3ciuki.png" class="p-img"></a> </td> <td class="Affiliate-product"> <a href="#" rel="nofollow" target="_blank"> <div class="p_title"> Razer Blade 14 </div> </a> </td> <td class="Affiliate-feature"> Razer Blade 14 offers powerful components and excellent performance. </td> <td class="Affiliate-btn"> <a href="#" rel="nofollow" target="_blank">Buy Now </a> </td> </tr> </tbody> </table>#3 : ตอนนี้เปลี่ยนชื่อผลิตภัณฑ์ คำอธิบายผลิตภัณฑ์ URL รูปภาพ และ URL ของลิงก์ในรหัสนี้
#4 : ตอนนี้คัดลอกโค้ด CSS ด้านล่างแล้ววางใต้โค้ดนี้
<style> /* Affiliate Product Box */ .Affiliate-product-table { margin: 30px 0; } .Affiliate-product-table thead { background: #424242; color: #fff; } .Affiliate-product-table, .Affiliate-product-table td, .Affiliate-product-table th { border: none; box-sizing: border-box; } .Affiliate-product-table thead th { font-weight: 300; font-size: 17px; padding: 10px; margin: 0; } .Affiliate-product-table tr { display: flex !important; flex-wrap: wrap !important; align-items: center; transition: 0.3s; } .Affiliate-product-table tbody tr:hover { transform: scale(1.02); transition: 0.3s; box-shadow: 0 0 20px -4px rgba(0, 0, 0, 0.15); } .Affiliate-product-table tbody tr { border: 2px solid #e1e1e1; margin-bottom: 5px; } .Affiliate-product-table tr td:first-child, .Affiliate-product-table tr th:first-child { width: 25%; } .Affiliate-product-table tr td:nth-child(2), .Affiliate-product-table tr th:nth-child(2) { width: 25%; } .Affiliate-product-table tr td:nth-child(3), .Affiliate-product-table tr th:nth-child(3) { width: 30%; } .Affiliate-product-table tr td:last-child, .Affiliate-product-table tr th:last-child { width: 20%; } .Affiliate-product-table .Affiliate-image { position: relative; } .Affiliate-product-table .p_tag { position: absolute; left: -10px; top: 0; background: #5898ff; padding: 5px 5px; color: #fff; font-size: 12px; text-transform: uppercase; } .Affiliate-product-table .p_tag::after { content: ' '; display: block; position: absolute; left: -10px; bottom: -7px; border-color: rgba(0, 0, 0, 0) #133091 rgba(0, 0, 0, 0) rgba(0, 0, 0, 0); border-style: inset solid inset inset; border-width: 0 10px 7px; } .Affiliate-product-table .p-img { width: 90%; max-height: 140px; margin: 0 auto; display: block; height: auto; object-fit: contain; } .Affiliate-product-table .Affiliate-product .p_title { font-weight: 600; font-size: 17px; line-height: 1.2; text-decoration: none; color: #4b77b7; } .Affiliate-product-table .Affiliate-btn a { background: #ef651e; text-transform: capitalize; padding: 10px; border-radius: 5px; color: #fff; font-size: 15px; display: block; text-align: center; transition: 0.3s; } .Affiliate-product-table .Affiliate-btn a:hover { background: #000; transition: 0.3s; } .Affiliate-product-table .Affiliate-feature { font-size: 16px; overflow: hidden; text-overflow: ellipsis; display: -webkit-box; -webkit-line-clamp: 10; -webkit-box-orient: vertical; } @media only screen and (max-width: 768px) { .Affiliate-product-table .p_tag { position: absolute; left: -20px; } .Affiliate-product-table tbody tr { padding: 10px; } .Affiliate-product-table tr td:first-child { width: 40%; } .Affiliate-product-table tr td:nth-child(2) { width: 60%; } .Affiliate-product-table tr td:nth-child(3), .Affiliate-product-table tr th:nth-child(3) { width: 100%; } .Affiliate-product-table tr td:last-child, .Affiliate-product-table tr th:last-child { width: 100%; } .Affiliate-product-table .Affiliate-btn a { margin-top: 20px; } .Affiliate-product-table tr th:nth-child(2) { width: 100%; } .Affiliate-product-table tr th:first-child, .Affiliate-product-table tr th:nth-child(3), .Affiliate-product-table tr th:last-child { display: none; } } /* End Affiliate Product Box */ </style>#5 : เผยแพร่หน้าแล้วเพิ่มตารางพันธมิตรผลิตภัณฑ์ในเว็บไซต์บล็อกเกอร์ของคุณ

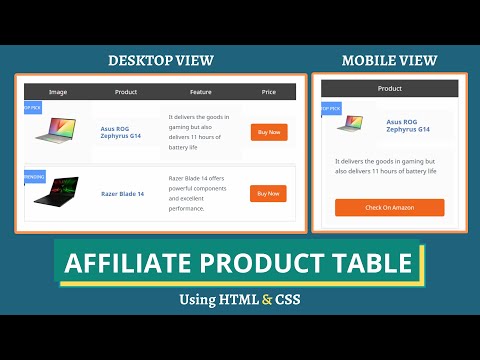
ตอนนี้ตารางเปรียบเทียบผลิตภัณฑ์จะมีลักษณะดังนี้ คุณยังสามารถเปลี่ยนสีปุ่ม สีหัวตารางโดยการเปลี่ยนโค้ด CSS
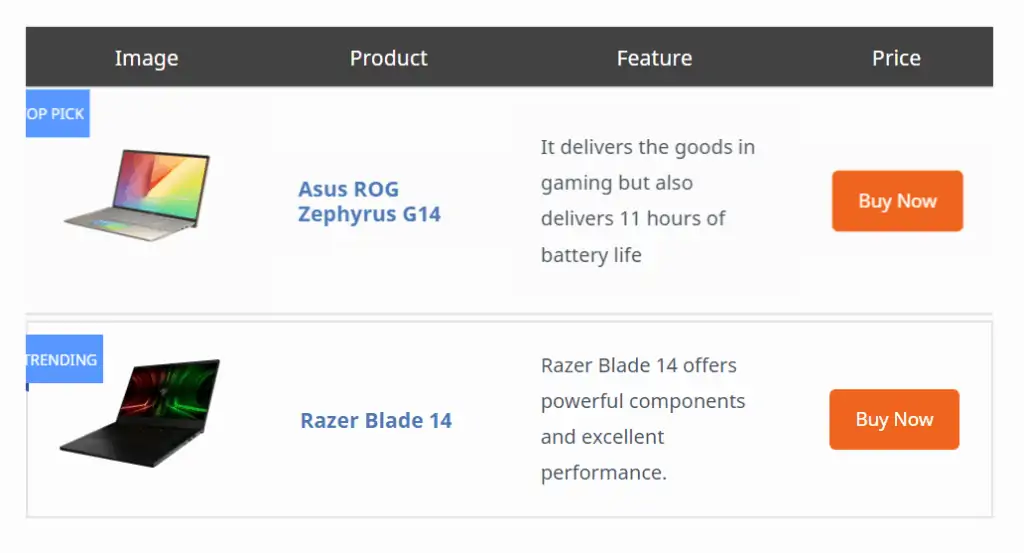
ที่นี่ คุณสามารถควบคุมรูปลักษณ์ของตารางได้อย่างเต็มที่และฟรี
คุณสามารถตรวจสอบวิดีโอด้านล่างเกี่ยวกับวิธีการแก้ไขรหัสนี้
จะเพิ่มตารางผลิตภัณฑ์ Affiliate ใน Wordpress ได้อย่างไร?
การเพิ่มตารางผลิตภัณฑ์ Affiliate เหล่านี้ทำได้ง่ายมาก คุณสามารถเพิ่มตารางนี้โดยใช้โค้ดด้านบนหรือใช้ ปลั๊กอินตาราง สำหรับสิ่งนั้น
หากต้องการเพิ่มตารางนี้โดยใช้รหัส สิ่งที่คุณต้องทำคือเปิดบล็อกโพสต์
ตอนนี้ค้นหาบล็อก HTML ที่กำหนดเอง แล้ววางโค้ดด้านบน ตอนนี้เปลี่ยนฟิลด์ที่จำเป็น เช่น ชื่อผลิตภัณฑ์ ลิงค์ผลิตภัณฑ์ คำอธิบาย ฯลฯ
ที่นี่ คุณสามารถดูตัวอย่างได้ในเครื่องมือแก้ไขโพสต์ ซึ่งช่วยให้มองเห็นบล็อกต่างๆ ได้ด้วยสายตา
หลังจากนั้นให้กดปุ่มเผยแพร่และตารางจะถูกเพิ่มลงในเว็บไซต์ Wordpress ของคุณ
ปวดหัวใหญ่ในวิธีนี้คือคุณต้องเปลี่ยนทุกอย่างในโค้ดด้วยตนเองแล้วตารางจะทำงาน
หากคุณต้องการแนวทางที่ง่ายกว่านี้ คุณสามารถใช้ปลั๊กอินเฉพาะสำหรับสิ่งนั้นได้ ดังนั้นคุณจึงสามารถแก้ไขตารางด้วยสายตาได้
แต่ส่วนใหญ่มีฟังก์ชันที่จำกัดในเวอร์ชันฟรี และคุณต้องจ่ายเงินบางส่วนสำหรับการเข้าถึงแบบเต็ม
ต่อไปนี้เป็นปลั๊กอินตารางสำหรับ Wordpress ที่ให้คุณสร้างตารางเปรียบเทียบผลิตภัณฑ์
- TablePress (ฟรี)
- ตัวสร้างตาราง WP
- AAWP
- AzonPress
- AmaLinks Pro
- บริษัทในเครือ
และหากคุณใช้ตัวสร้างเพจ เช่น Elementor ตัวสร้างบล็อก Kadence คุณสามารถสร้างตารางพันธมิตร amazon ประเภทนี้ได้ตั้งแต่เริ่มต้น
คุณยังสามารถใช้ตาราง Wordpress เริ่มต้นได้ แต่ตารางนี้ไม่ตอบสนองและทำงานได้อย่างสมบูรณ์แบบสำหรับตารางขนาดเล็กที่มีสองคอลัมน์
นั่นเป็นเหตุผลที่ฉันแนะนำให้คุณใช้วิธีโค้ดเนื่องจากให้การปรับแต่งแบบสมบูรณ์และตารางตอบสนองได้อย่างเต็มที่ มันปรับขนาดของตารางตามขนาดหน้าจอ
คุณสามารถใช้ตารางนี้เพื่อโปรโมตผลิตภัณฑ์ในเครือ Amazon หรือบริการในเครืออื่นๆ เช่น โฮสติ้ง ปลั๊กอิน ฯลฯ
ตารางพันธมิตรนี้ทำให้เนื้อหาดูเป็นมืออาชีพและเพิ่มโอกาสในการคลิกและการแปลงลิงก์
หากคุณมีข้อสงสัยเกี่ยวกับเรื่องนี้ อย่าลังเลที่จะถามฉันในส่วนความคิดเห็น
หากคุณต้องการอัพเดทเคล็ดลับและลูกเล่นล่าสุดที่เกี่ยวข้องกับบล็อก ให้พิจารณาสมัครรับข้อมูลจาก Key2blogging ช่อง Youtube ของเรา
แนะนำ : วิธีเพิ่มตารางข้อดีและข้อเสียโดยใช้ HTML & CSS