
如何在 Blogger 中添加彈出式下載計時器按鈕
已發表: 2022-02-26在本文中,我將向您展示如何將倒數計時器按鈕添加到Blogger網站。 因此,每當有人點擊下載按鈕時,它會顯示一個帶有 20 秒倒計時的彈出窗口,您可以在其上放置 AdSense 廣告。
因此,通過這種方式,您可以讓訪問者在您的博客文章上停留更長時間,並降低跳出率並增加總體停留時間。 因此,它有助於提高網站的參與度並有助於 SEO。
要在 Blogger 中添加彈出式下載計時器按鈕,請按照以下步驟操作。
1. 轉到Blogger 儀表板並打開博客文章。
2. 現在粘貼HTML 代碼並替換下載按鈕鏈接、Adsense Publisher id和廣告位代碼。
<p><a class="button" href="#PopupDownload"><i class='icon download'></i>Download</a></p> <div data-ml-modal=""> <div class="Popup_container"></div> <div class="modal-dialog"> <div class="Popup_content center"> <div class="adpop-top"> <h2> Download Your file </h2> <div class="ad-pop__close"><svg viewbox="0 0 512 512" xmlns="http://www.w3.org/2000/svg"><path d="M278.6 256l68.2-68.2c6.2-6.2 6.2-16.4 0-22.6-6.2-6.2-16.4-6.2-22.6 0L256 233.4l-68.2-68.2c-6.2-6.2-16.4-6.2-22.6 0-3.1 3.1-4.7 7.2-4.7 11.3 0 4.1 1.6 8.2 4.7 11.3l68.2 68.2-68.2 68.2c-3.1 3.1-4.7 7.2-4.7 11.3 0 4.1 1.6 8.2 4.7 11.3 6.2 6.2 16.4 6.2 22.6 0l68.2-68.2 68.2 68.2c6.2 6.2 16.4 6.2 22.6 0 6.2-6.2 6.2-16.4 0-22.6L278.6 256z"></path></svg></div> </div> <br /> <div> <!--Change data adslot & Adclient code here--> <ins class="adsbygoogle" data-ad-client="ca-pub-xxxxxxxxxxxx" data-ad-slot="xxxxxxxxxxx" data-ad-format="auto" data-full-width-responsive="true"></ins> <script> (adsbygoogle = window.adsbygoogle || []).push({}); </script></div> <br /> <a class="button" href=" # "><i class="icon download"></i> Download File </a> </div></div></div>3. 然後復制CSS & Javascript 代碼並將其粘貼到上方</正文> 標籤。
<b:if cond='data:view.isPost'> <script> //<![CDATA[ var downloadButton = document.getElementById("Popup_Download_btn"); var counter = 20; var newElement = document.createElement("span"); newElement.innerHTML = "Please Wait 20 sec"; var id; downloadButton.parentNode.replaceChild(newElement, downloadButton); function startDownload() { this.style.display = 'none'; id = setInterval(function () { counter--; if (counter < 0) { newElement.parentNode.replaceChild(downloadButton, newElement); clearInterval(id); } else { newElement.innerHTML = "Please Wait" + " " + counter.toString() + " " + " sec.... "; } }, 1000); }; var clickbtn = document.getElementById("get-download"); clickbtn.onclick = startDownload; //]]> </script> </b:if> <b:if cond='data:view.isPost'> <style> #Popup_Download_btn{display:inline-flex;display:-webkit-inline-flex;flex-wrap:wrap;-webkit-flex-wrap:wrap;align-items:center;-webkit-align-items:center;margin-bottom:10px;padding:9px 20px;border-radius:10px;font-size:.8rem;line-height:1.3rem;background-color:#303e9f;color:#ffffff; font-weight: bold;} .adpop-top{height:40px;width:100%;border-bottom:1px #E5E5E5 solid} .btn-at{display:block;height:50px;color:#fff!important;font-size:18px;text-transform:uppercase;background:#f3a;text-align:center;line-height:50px;width:200px;margin:12px auto;transition:all 0.4s ease-in} [data-ml-modal]{position:fixed;top:0;bottom:0;left:0;right:0;overflow-x:hidden;overflow-y:auto;-webkit-overflow-scrolling:touch;z-index:999;width:0;height:0;opacity:0} [data-ml-modal]:target{width:auto;height:auto;opacity:1;-webkit-transition:opacity 1s ease;transition:opacity 1s ease} [data-ml-modal]:target .Popup_container{position:fixed;top:0;bottom:0;left:0;right:0;cursor:pointer;background-color:#000;background-color:rgba(0,0,0,0.7);z-index:1} [data-ml-modal] .modal-dialog{border-radius:6px;box-shadow:0 11px 15px -7px rgba(0,0,0,0.2),0 24px 38px 3px rgba(0,0,0,0.14),0 9px 46px 8px rgba(0,0,0,0.12);position:relative;width:90%;max-width:660px;max-height:70%;margin:10% auto;overflow-x:hidden;overflow-y:auto;z-index:2} [data-ml-modal] .Popup_content{background:#fff;padding:23px 27px} @media (max-width:767px){[data-ml-modal] .modal-dialog{margin:20% auto}} .ad-pop__close{position:absolute;right:1em;top:1em;width:1.1em;height:1.1em;cursor:pointer} .icon {display: inline-block;vertical-align: middle;margin-right: 10px;width: 18px;height: 18px;background-size: cover;background-repeat: no-repeat;background-position: center center;} .button .icon.download { background-image: url("data:image/svg+xml,<svg xmlns='http://www.w3.org/2000/svg' viewBox='0 0 24 24' fill='none' stroke='%23fefefe' stroke-linecap='round' stroke-linejoin='round' stroke-width='1.5'><path d='M3 17v3a2 2 0 0 0 2 2h14a2 2 0 0 0 2-2v-3'/><polyline points='8 12 12 16 16 12'/><line x1='12' x2='12' y1='2' y2='16'/></svg>"); } </style> </b:if>4. 現在您的彈出式下載計時器按鈕將在 Blogger 網站上使用。

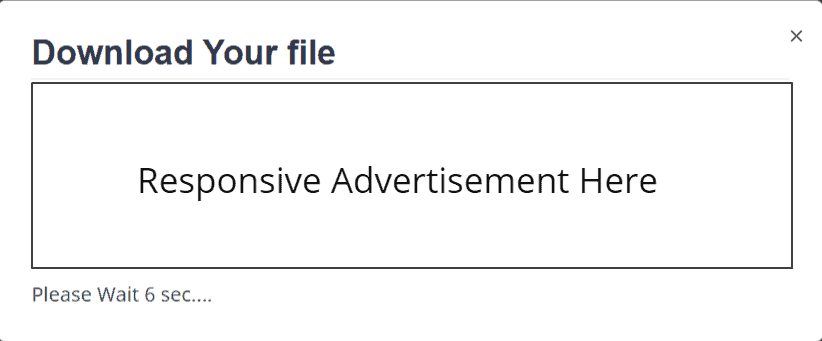
這個下載彈出窗口是完全響應的,適用於所有類型的設備。
在這裡,請注意,這個計時器按鈕代碼只會加載到Post 頁面上,因為我們只設置了if 條件。 如果你想在頁面上使用它,那麼你可以從你的代碼中刪除它。
如果你不知道if 條件在 Blogger 中是如何工作的,那麼你可以參考這篇文章。
如果要更改倒數計時器時間,則可以更改 Javascript 代碼中的值。 在 JS 上找到此代碼。 [變量計數器= 20; ]
這裡的 20 值是指20sec ,您可以根據需要更改該值。
下載定時器的好處
我希望您已成功將下載計時器按鈕添加到您的 Blogger 網站。
注意:如果此代碼在您的主題上無法正常工作,那麼您可以使用下面給出的替代彈出下載計時器代碼。
如果您在安裝倒數計時器按鈕的過程中遇到任何問題,可以在評論部分詢問我。
不要忘記加入我們的 Telegram Group 和 YouTube 頻道。
另請閱讀:如何在 Blogger 中添加 Mailchimp 註冊表單