
Blogger에서 팝업 다운로드 타이머 버튼을 추가하는 방법
게시 됨: 2022-02-26이 기사에서는 Blogger 웹사이트에 카운트다운 타이머 버튼을 추가하는 방법을 보여 드리겠습니다. 따라서 누군가가 다운로드 버튼을 클릭할 때마다 20초 카운트다운 타이머가 있는 팝업 창이 표시되고 여기에 애드센스 광고를 게재할 수 있습니다.
따라서 이러한 방식으로 방문자를 블로그 게시물에 더 오래 유지하고 이탈률을 줄이고 전체 체류 시간을 늘릴 수 있습니다. 따라서 웹 사이트 참여를 늘리고 SEO에 도움이 됩니다.
Blogger에 팝업 다운로드 타이머 버튼을 추가하려면 다음 단계를 따르세요.
1. Blogger 대시보드 로 이동하여 블로그 게시물을 엽니다.
2. 이제 HTML 코드 를 붙여넣고 다운로드 버튼 링크 , Adsense 게시자 ID 및 광고 슬롯 코드 를 교체합니다.
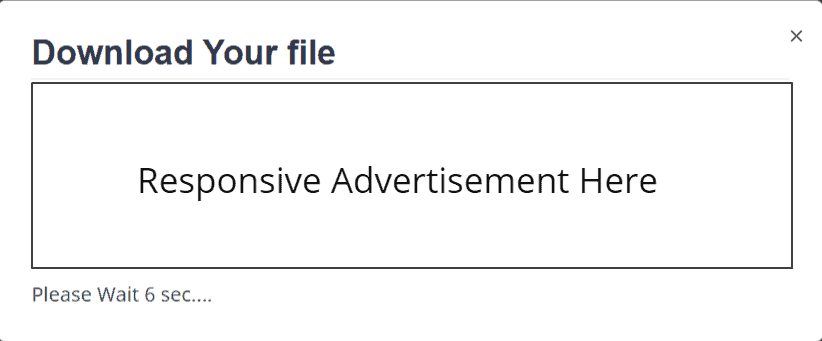
<p><a class="button" href="#PopupDownload"><i class='icon download'></i>Download</a></p> <div data-ml-modal=""> <div class="Popup_container"></div> <div class="modal-dialog"> <div class="Popup_content center"> <div class="adpop-top"> <h2> Download Your file </h2> <div class="ad-pop__close"><svg viewbox="0 0 512 512" xmlns="http://www.w3.org/2000/svg"><path d="M278.6 256l68.2-68.2c6.2-6.2 6.2-16.4 0-22.6-6.2-6.2-16.4-6.2-22.6 0L256 233.4l-68.2-68.2c-6.2-6.2-16.4-6.2-22.6 0-3.1 3.1-4.7 7.2-4.7 11.3 0 4.1 1.6 8.2 4.7 11.3l68.2 68.2-68.2 68.2c-3.1 3.1-4.7 7.2-4.7 11.3 0 4.1 1.6 8.2 4.7 11.3 6.2 6.2 16.4 6.2 22.6 0l68.2-68.2 68.2 68.2c6.2 6.2 16.4 6.2 22.6 0 6.2-6.2 6.2-16.4 0-22.6L278.6 256z"></path></svg></div> </div> <br /> <div> <!--Change data adslot & Adclient code here--> <ins class="adsbygoogle" data-ad-client="ca-pub-xxxxxxxxxxxx" data-ad-slot="xxxxxxxxxxx" data-ad-format="auto" data-full-width-responsive="true"></ins> <script> (adsbygoogle = window.adsbygoogle || []).push({}); </script></div> <br /> <a class="button" href=" # "><i class="icon download"></i> Download File </a> </div></div></div>3. 그런 다음 CSS 및 Javascript 코드 를 복사하여 위에 붙여넣습니다. </바디> 꼬리표.
<b:if cond='data:view.isPost'> <script> //<![CDATA[ var downloadButton = document.getElementById("Popup_Download_btn"); var counter = 20; var newElement = document.createElement("span"); newElement.innerHTML = "Please Wait 20 sec"; var id; downloadButton.parentNode.replaceChild(newElement, downloadButton); function startDownload() { this.style.display = 'none'; id = setInterval(function () { counter--; if (counter < 0) { newElement.parentNode.replaceChild(downloadButton, newElement); clearInterval(id); } else { newElement.innerHTML = "Please Wait" + " " + counter.toString() + " " + " sec.... "; } }, 1000); }; var clickbtn = document.getElementById("get-download"); clickbtn.onclick = startDownload; //]]> </script> </b:if> <b:if cond='data:view.isPost'> <style> #Popup_Download_btn{display:inline-flex;display:-webkit-inline-flex;flex-wrap:wrap;-webkit-flex-wrap:wrap;align-items:center;-webkit-align-items:center;margin-bottom:10px;padding:9px 20px;border-radius:10px;font-size:.8rem;line-height:1.3rem;background-color:#303e9f;color:#ffffff; font-weight: bold;} .adpop-top{height:40px;width:100%;border-bottom:1px #E5E5E5 solid} .btn-at{display:block;height:50px;color:#fff!important;font-size:18px;text-transform:uppercase;background:#f3a;text-align:center;line-height:50px;width:200px;margin:12px auto;transition:all 0.4s ease-in} [data-ml-modal]{position:fixed;top:0;bottom:0;left:0;right:0;overflow-x:hidden;overflow-y:auto;-webkit-overflow-scrolling:touch;z-index:999;width:0;height:0;opacity:0} [data-ml-modal]:target{width:auto;height:auto;opacity:1;-webkit-transition:opacity 1s ease;transition:opacity 1s ease} [data-ml-modal]:target .Popup_container{position:fixed;top:0;bottom:0;left:0;right:0;cursor:pointer;background-color:#000;background-color:rgba(0,0,0,0.7);z-index:1} [data-ml-modal] .modal-dialog{border-radius:6px;box-shadow:0 11px 15px -7px rgba(0,0,0,0.2),0 24px 38px 3px rgba(0,0,0,0.14),0 9px 46px 8px rgba(0,0,0,0.12);position:relative;width:90%;max-width:660px;max-height:70%;margin:10% auto;overflow-x:hidden;overflow-y:auto;z-index:2} [data-ml-modal] .Popup_content{background:#fff;padding:23px 27px} @media (max-width:767px){[data-ml-modal] .modal-dialog{margin:20% auto}} .ad-pop__close{position:absolute;right:1em;top:1em;width:1.1em;height:1.1em;cursor:pointer} .icon {display: inline-block;vertical-align: middle;margin-right: 10px;width: 18px;height: 18px;background-size: cover;background-repeat: no-repeat;background-position: center center;} .button .icon.download { background-image: url("data:image/svg+xml,<svg xmlns='http://www.w3.org/2000/svg' viewBox='0 0 24 24' fill='none' stroke='%23fefefe' stroke-linecap='round' stroke-linejoin='round' stroke-width='1.5'><path d='M3 17v3a2 2 0 0 0 2 2h14a2 2 0 0 0 2-2v-3'/><polyline points='8 12 12 16 16 12'/><line x1='12' x2='12' y1='2' y2='16'/></svg>"); } </style> </b:if>4. 이제 팝업 다운로드 타이머 버튼이 Blogger 웹사이트에서 작동합니다.

이 다운로드 팝업은 완벽하게 반응하며 모든 유형의 장치에서 잘 작동합니다.
여기에서 이 타이머 버튼 코드는 if 조건 만 설정했기 때문에 Post 페이지 에만 로드됩니다. 페이지에서 사용하려는 경우 코드에서 제거할 수 있습니다.
Blogger에서 if 조건이 어떻게 작동하는지 모르는 경우 이 문서를 참조할 수 있습니다.
카운트다운 타이머 시간을 변경하려면 Javascript 코드에서 값을 변경할 수 있습니다. JS에서 이 코드를 찾으십시오. [ var 카운터 = 20; ]
여기서 20 값은 20sec 을 의미하며 필요에 따라 값을 변경할 수 있습니다.
다운로드 타이머의 이점
Blogger 웹사이트에 타이머 다운로드 버튼을 성공적으로 추가하셨기를 바랍니다.
참고 : 이 코드가 테마에서 제대로 작동하지 않으면 아래 제공된 대체 팝업 다운로드 타이머 코드를 사용할 수 있습니다.
카운트다운 타이머 버튼을 설치하는 동안 문제가 발생하면 댓글 섹션에서 저에게 질문할 수 있습니다.
Telegram Group 및 YouTube 채널에 가입하는 것을 잊지 마십시오.
더 읽어 보기: Blogger에서 Mailchimp 가입 양식을 추가하는 방법