
WordPress 테마 사용자 지정 프로그램에 대한 사용자 지정 컨트롤을 만드는 방법
게시 됨: 2015-06-17WordPress 테마 사용자 지정 프로그램("사용자 지정 프로그램"이라고도 함) 기능은 개발자가 테마 모양을 사용자 지정할 수 있는 기능을 제공하고 테마 변경 사항을 실시간으로 미리 볼 수 있도록 도와줍니다. 웹사이트로 고객을 유치하기 위한 경쟁이 심화되는 오늘날과 같은 시대에 웹사이트 디자인을 사용자 정의해야 할 필요성을 자주 느낄 것입니다. 그리고 테마 커스터마이저 덕분에 워드프레스 디자인의 변경 사항을 실시간으로 미리 볼 수 있어 소중한 시간을 많이 절약할 수 있습니다.
WordPress 테마 커스터마이저는 Theme Customization API의 일부로 도입되었습니다(WordPress 버전 3.4에서 도입되었습니다. 테마 설정을 변경하려면 테마와 함께 제공되는 사용자 정의 컨트롤을 사용해야 합니다. 확인란, 텍스트 필드, 라디오 및 기타 몇 가지와 같은 사용자 지정 기능이 있지만 WordPress 테마에 사용자 지정 컨트롤을 추가하려면 어떻게 해야 할까요?
특정 요구 사항에 맞게 조정된 컨트롤을 만들고 추가하는 방법을 이해하는 데 도움이 되도록 테마 바닥글을 약간 변경하는 세 가지 사용자 지정 컨트롤을 만드는 방법을 보여드리겠습니다. 그러나 프로세스를 시작하려면 먼저 WP_Customizer_Control 클래스에 익숙해져야 합니다.
"WP_Customizer_Control" 클래스에 대해 알아보기
사용자 지정 컨트롤을 생성하려면 새 클래스를 만들고 WP_Customizer_Control 클래스를 사용하여 확장해야 합니다. 이 클래스는 "$wp_customize->add_control()" 메서드를 사용하여 WordPress 사이트 테마 사용자 정의 화면에 사용자 정의 컨트롤을 추가합니다. 또한 이 메서드에 액세스하려면 작업 후크에서 사용할 수 있는 $wp_customize 개체를 사용해야 합니다.
다음과 같이 테마 섹션('customize_register' 작업 후크)에 기존 사용자 지정 컨트롤을 추가하는 방법을 보여주는 예를 살펴보겠습니다.
$wp_customize->add_control( new WP_Customize_Header_Image_ Control( $wp_customize, 'header_image', array( 'label' => __( 'Header image', 'mynewtheme' ), 'section' => 'header_image_settings', 'settings' => 'header_image_position', ) ) );$wp_customize->add_control( new WP_Customize_Header_Image_ Control( $wp_customize, 'header_image', array( 'label' => __( 'Header image', 'mynewtheme' ), 'section' => 'header_image_settings', 'settings' => 'header_image_position', ) ) );
위의 예에서는 사용자에게 새 헤더 이미지를 선택할 수 있는 기능을 제공하는 컨트롤을 만들고 있습니다.
시연하는 예: 더 많은 사용자 지정 컨트롤을 만드는 방법은 무엇입니까?
이 섹션은 세 가지 다른 단계로 나뉘며 각 단계에는 테마 사용자 지정 프로그램의 텍스트 영역에 대한 사용자 지정 컨트롤을 생성하는 코드가 포함되어 있습니다. 새로운 텍스트 영역 컨트롤을 통해 바닥글을 변경할 수 있도록 WordPress 테마의 footer.php 파일에 코드를 추가합니다.
1단계: 간단한 텍스트 영역 컨트롤 만들기
위에서 논의한 것처럼 새 사용자 정의 컨트롤을 생성하려면 WP_Customize_Control 클래스를 확장하는 데 사용할 클래스를 정의해야 합니다. 기본적으로 이 클래스는 테마 사용자 지정 화면에 입력 컨트롤(즉, 사용자 지정 컨트롤)을 추가하기 위해 WordPress Theme Customization API와 함께 사용됩니다. 이 작업을 구현하는 코드를 살펴보겠습니다.
/*Customizer Code HERE*/ add_action('customize_ register', 'theme_footer_customizer'); function theme_footer_customizer($wp_ customize){ //adding section in wordpress customizer $wp_customize->add_section(' footer_settings_section', array( 'title' => 'Footer Text Section' )); //adding setting for footer text area $wp_customize->add_setting(' text_setting', array( 'default' => 'Default Text For Footer Section', )); $wp_customize->add_control(' text_setting', array( 'label' => 'Footer Text Here', 'section' => 'footer_settings_section', 'type' => 'textarea', ));/*Customizer Code HERE*/ add_action('customize_ register', 'theme_footer_customizer'); function theme_footer_customizer($wp_ customize){ //adding section in wordpress customizer $wp_customize->add_section(' footer_settings_section', array( 'title' => 'Footer Text Section' )); //adding setting for footer text area $wp_customize->add_setting(' text_setting', array( 'default' => 'Default Text For Footer Section', )); $wp_customize->add_control(' text_setting', array( 'label' => 'Footer Text Here', 'section' => 'footer_settings_section', 'type' => 'textarea', ));
이 코드에서 customer_register 작업 후크는 WordPress에 사용자 지정 기능에 대해 알리는 데 사용되며 우리는 theme_footer_customizer라는 이름으로 생성했습니다. 아시다시피 WP_Customize_Manager 클래스는 WordPress Theme Customizer를 제어하는 데 도움이 되므로 사용자 지정 컨트롤이 이 클래스의 일부가 됩니다. 그러나 컨트롤에 액세스하려면 사용자 정의_등록 후크의 인스턴스인 "wp_customize" 개체를 사용해야 합니다.

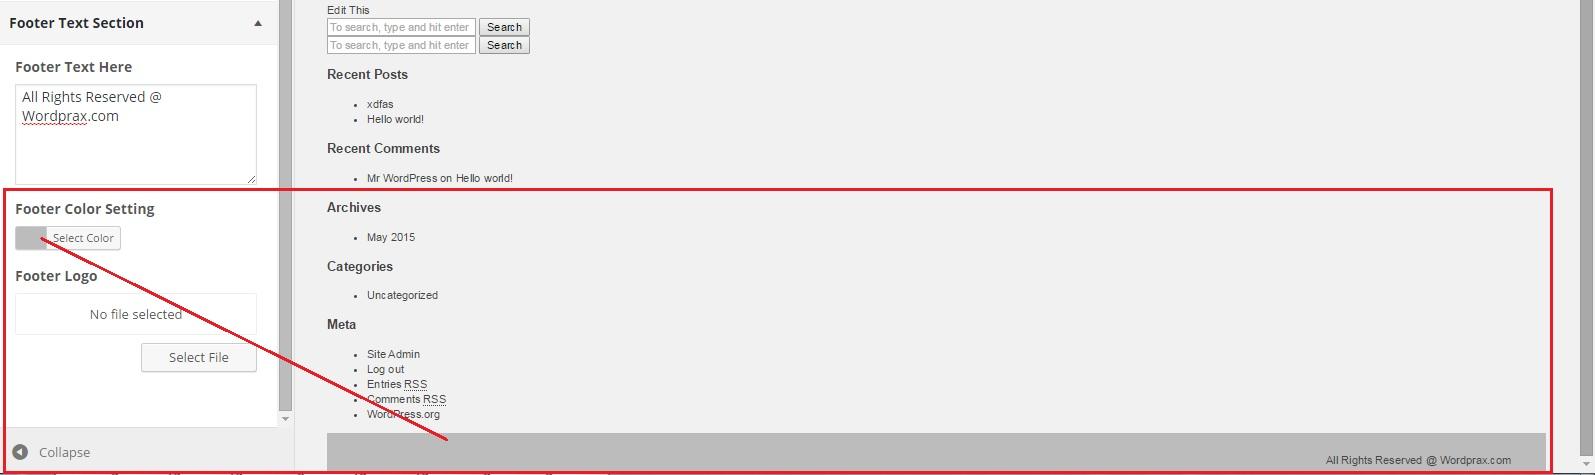
우리의 경우 wp_customize 객체는 텍스트 영역에 포함될 새 바닥글 섹션을 정의하는 데 사용됩니다. 따라서 바닥글 섹션 "텍스트 영역"에 입력하는 내용은 아래 스크린샷과 같이 테마 바닥글에 표시됩니다.

이 스크린샷에서 새로운 "바닥글 텍스트 섹션"이 테마에 추가된 것을 볼 수 있습니다. 이 섹션에 작성된 텍스트는 테마 바닥글에 표시됩니다.
2단계: 배경색을 변경하기 위해 사용자 정의 컨트롤 추가하기
이제 텍스트 영역 컨트롤을 만들었으므로 여기에 다양한 사용자 지정 컨트롤을 추가할 수 있습니다. 이 예에서는 바닥글의 배경색을 변경하는 데 도움이 되는 사용자 지정 컨트롤을 새 바닥글 텍스트 섹션에 추가합니다. 그렇게 하려면 테마의 footer.php 파일에 다음 코드 스니펫을 추가하기만 하면 됩니다.
//adding setting for background $wp_customize->add_setting(' background_color', array( 'default' => '#ffffff', ) ); $wp_customize->add_control( new WP_Customize_Color_Control( $wp_customize, 'background_color', array( 'label' => 'Footer Color Setting', 'section' => 'footer_settings_section', 'settings' => 'background_color', )));//adding setting for background $wp_customize->add_setting(' background_color', array( 'default' => '#ffffff', ) ); $wp_customize->add_control( new WP_Customize_Color_Control( $wp_customize, 'background_color', array( 'label' => 'Footer Color Setting', 'section' => 'footer_settings_section', 'settings' => 'background_color', )));
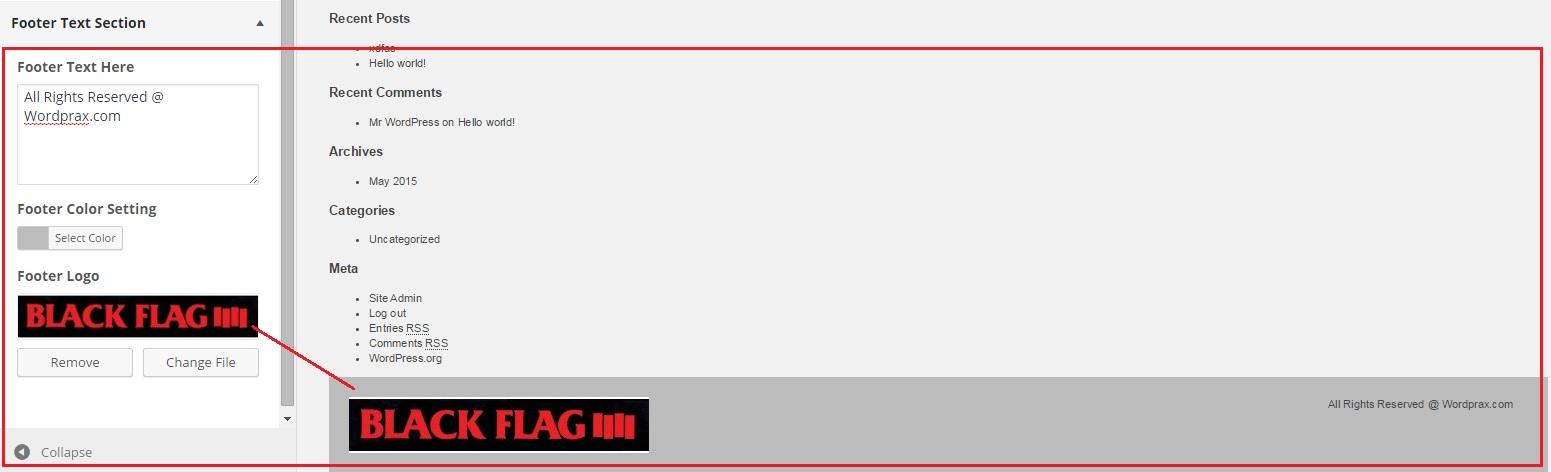
위 스크린샷과 같이 "바닥글 색상 설정"에서 적절한 색상을 선택하면 바닥글의 배경색이 회색으로 변경됩니다.
3단계: 로고를 추가하기 위해 사용자 정의 컨트롤 추가하기
바닥글 텍스트 섹션에 추가할 또 다른 컨트롤은 "바닥글 로고"입니다. 이름에서 알 수 있듯이 '바닥글 로고' 컨트롤은 바닥글 로고를 추가하는 데 도움이 됩니다. 이 컨트롤을 추가하려면 footer.php 파일에 아래 코드 스니펫을 포함해야 합니다.
//adding setting for footer logo $wp_customize->add_setting(' footer_logo'); $wp_customize->add_control(new WP_Customize_Upload_Control($ wp_customize,'footer_logo', array( 'label' => __('Footer Logo', 'mytheme'), 'section' => 'footer_settings_section', 'settings' => 'footer_logo', ))); }//adding setting for footer logo $wp_customize->add_setting(' footer_logo'); $wp_customize->add_control(new WP_Customize_Upload_Control($ wp_customize,'footer_logo', array( 'label' => __('Footer Logo', 'mytheme'), 'section' => 'footer_settings_section', 'settings' => 'footer_logo', ))); }
마무리하자!
사용자 지정 컨트롤을 만드는 과정은 시간이 좀 걸릴 수 있습니다. 그러나 웹 사이트 테마 사용자 지정 화면에 더 나은 컨트롤을 추가할수록 사용자의 시간을 더 많이 절약할 수 있으므로 사용자 경험이 향상된다는 사실을 무시할 수 없습니다. 따라서 WordPress 테마 사용자 지정 프로그램에 추가할 몇 가지 사용자 지정 컨트롤을 직접 구축할 계획이라면 이 게시물이 유용한 가이드가 될 것입니다.